
Living in a tiny home or van means every inch counts, yet cold drinks remain a daily necessity. Standard refrigerator ice trays take up precious freezer space, and constant trips to gas stations for bagged ice disrupt your off-grid freedom. A portable ice maker solves both problems by delivering fresh ice on demand without sacrificing your limited square footage or draining your power reserves.
Why You Need a Dedicated Ice Maker in a Small Space
Freezer space in a tiny kitchen is worth its weight in gold. Traditional ice trays occupy valuable freezer space that could store frozen vegetables, proteins, or meal prep containers. When you're living in 200 square feet or less, choosing between ice and groceries becomes a frustrating daily decision.
Space Efficiency That Actually Matters
A countertop ice maker frees up your freezer compartment completely. Removing ice trays creates room for emergency food supplies, frozen meals during travel days, or that pint of ice cream you’ve been craving. The machine itself sits on your counter only when needed, then tucks away in a cabinet or under-seat storage during transit.
Breaking Free From Ice Runs
Bagged ice from convenience stores feels easy at first, but the cost and hassle add up fast. Ice prices vary a lot by location and season, and frequent stops also burn time and fuel. If you’re living small or traveling, having a dedicated ice maker isn’t always “cheaper,” but it can be far more consistent and convenient, especially when you want ice daily.
Control Over Water Quality
Store-bought ice sits in unknown conditions, handled by various workers, and exposed to potential contamination. Making ice with your own filtered water gives you complete control over what goes into your beverages. You know exactly when the last cleaning happened and what touched your ice cubes, particularly important when preparing drinks for children or immune-compromised individuals.

Bullet Ice vs. Nugget Ice: Which Texture Is Right for You?
The ice type your machine produces affects everything from drink dilution speed to chewing satisfaction. Understanding these differences helps match the right model for your lifestyle.
Bullet Ice Characteristics
Bullet ice forms as hollow cylinders with a rounded tip. The shape melts faster than solid cubes due to its thin walls and air pocket center, making it ideal for quickly chilling beverages you'll finish within 20 minutes. Key advantages include:
- Smooth sides slide easily through narrow water bottle openings
- Rounded shape is less likely to chip thin glass, but chewing any ice can crack teeth or damage dental work
- Most models complete a batch in 6 to 8 minutes
- Lower operational noise during production
- Better for fast beverage cooling
Nugget Ice Benefits
Nugget ice delivers that beloved Sonic-style texture through a different process. Machines shave ice from a frozen cylinder, then compress the flakes into porous pellets. The resulting pieces absorb beverage flavors while maintaining their structure longer than bullet ice. Coffee enthusiasts prefer nugget ice for iced lattes because the porous texture blends smoothly without creating jarring temperature zones.
| Feature | Bullet Ice | Nugget Ice |
| Melting Speed | Fast (hollow center) | Medium (compressed flakes) |
| Texture | Hard, smooth | Soft, chewable |
| Best For | Quick-chill drinks, water bottles | Cocktails, blended drinks, chewing |
| Production Time | 6-8 minutes | 8-12 minutes |
| Noise Level | Lower | Moderate |
Your beverage habits should guide your choice. Frequent smoothie makers and cocktail enthusiasts benefit from nugget ice's superior blending properties. Those prioritizing speed and quiet operation, while simply wanting cold water, find bullet ice perfectly adequate.

Top Features to Look for in a Compact Ice Maker
Selecting the right unit requires evaluating several technical specifications against your actual living conditions and usage patterns. The following features separate reliable machines from frustrating purchases.
Size and Weight Considerations
Physical dimensions directly impact whether a unit fits in your available counter space. Models measuring 9 to 12 inches wide work in most tiny kitchens, though you must account for ventilation clearance on all sides. Weight matters equally when securing appliances during travel:
- 13 to 15 pounds: Easiest for one person to move, ideal for frequent relocation
- 16 to 18 pounds: Stable during transit, manageable with proper handles
- 19+ pounds: Better for stationary tiny homes, challenging for van installations
Daily Production Capacity
Production capacity ranges from 26 to 45 pounds across popular portable ice maker machine. A solo traveler consuming ice primarily for drinks rarely exceeds 5 pounds daily, making even entry-level units sufficient. Couples or families hosting outdoor gatherings should target a 35-pound-plus capacity to avoid running out during peak usage. Remember that stated capacity assumes continuous operation in ideal conditions; actual output drops in hot weather or when the machine cycles on and off.
Ice-Making Speed
Production speed determines how quickly you recover from an empty ice basket. Quality ice makers deliver the first batch in 6 to 13 minutes, then maintain consistent cycles throughout the day. Consider these benchmarks:
- 6 to 8 minutes: Excellent for rapid ice needs, premium models
- 9 to 12 minutes: Standard performance, adequate for most users
- 13+ minutes: Slower but often paired with larger batch sizes
Noise Output
Noise levels deserve careful consideration in small living spaces where you can't escape to another room. Units operating below 45 decibels compared to a quiet library won't disrupt conversations or sleep. Models reaching 50 to 55 decibels feel similar to normal indoor conversation, noticeable but not intrusive. Check reviews specifically mentioning fan noise and compressor sounds since specifications alone don't capture the full acoustic experience.
Portability Features
Built-in handles transform portability from theory to practice. Carrying a 15-pound appliance without proper grips risks dropping it or damaging internal components. Sturdy handles let you move the machine from the kitchen to the outdoor patio for parties, then stow it away when driving to new locations. Some designs include recessed handles that save space while providing secure purchase points.

Self-Cleaning Functions
Automatic cleaning can help reduce mineral buildup and odors, but it doesn’t replace proper cleaning. Most self-clean cycles circulate water through the system (and cleaner only if you add it), so follow the manufacturer’s instructions.
Water Tank Size
Reservoir capacity affects refill frequency. Common sizes include:
- 1.2 liters: Requires refills every 3 cycles, compact footprint
- 1.5 to 1.8 liters: Balanced capacity, 4 cycles between fills
- 2.0+ liters: Extended operation, adds weight and bulk
Transparent water level indicators help you gauge refill timing at a glance rather than opening the lid repeatedly.
Power Consumption: Can Your Solar Setup Handle It?
Understanding electrical requirements prevents frustrating discoveries that your power system can't support ice production. Most portable models draw between 100 and 170 watts during active ice making, comparable to a laptop computer. Standby draw is usually low when the ice basket fills, and the compressor pauses (often single-digit watts), but it varies by model and whether features like indicator lights stay on.
Calculating Daily Energy Use
The “wattage” you see (often 100–170W) is mainly the draw while the compressor is running. Countertop ice makers cycle on and off, so daily energy depends on how many batches you make and how hot the space is. A practical estimate is:
Daily Wh ≈ (running watts × compressor-on hours) + (standby watts × remaining hours).
Example: if a unit averages ~140W while running and the compressor runs ~3 hours total in a day, that’s about 420Wh (0.42kWh) plus a small amount of standby power. Hot ambient temperatures increase compressor run time.
Solar Panel Requirements
Solar panel capacity largely determines the feasibility for off-grid ice production (and real output depends on sun hours, angle, temperature, and system losses):
- 100-watt panel: In strong sun, often ~300–500Wh/day usable. Usually enough for a small daily ice run with a battery, but it can be tight.
- 200 watts (two 100W panels): Often ~600–1,000Wh/day usable in good sun—more realistic for regular daily ice.
- 300+ watts: Adds buffer for clouds, heat, and running other loads at the same time.
In good sunlight, two 100-watt panels paired with a ~1,000Wh power station can often cover light-to-moderate ice making (a few hours of total compressor run time). On cloudy days or in extreme heat, you may need to make less ice, lean on vehicle/shore charging, or start with a fuller battery.
Battery Capacity Planning
Runtime depends on usable battery energy (after inverter losses) and the ice maker’s actual running watts. A good rule of thumb is:
Compressor-on hours ≈ (usable Wh) ÷ (running watts).
With a 500Wh station, usable energy is often roughly 350–450Wh. If your ice maker draws 120–170W while running, that’s about 2–4 hours of compressor-on time (spread across a longer real-world window because the machine cycles). Plan an extra buffer if you also need the station for lights, a fridge, or device charging.
Power-Saving Strategies
Minimize consumption through smart operational habits:
- Make ice during cooler morning hours when compressors work more efficiently
- Position the unit in shaded areas to reduce thermal stress
- Fill ice bags and transfer to your cooler rather than leaving the machine running constantly
- Run production cycles back-to-back instead of throughout the day
Installation and Placement Tips for Tiny Kitchens
Proper installation extends equipment life and optimizes performance. The following setup considerations prevent common problems that plague poorly positioned units.

Surface Leveling
Level surfaces prevent operational issues and excessive noise. When an ice maker sits tilted, water distributes unevenly across the freezing mechanism, potentially causing incomplete ice formation or triggering false sensor readings. Use a bubble level to verify placement, adding shims beneath feet if necessary. This takes two minutes but prevents weeks of frustration, troubleshooting mysterious malfunctions.
Ventilation Clearance
Leave at least 4 to 6 inches of open space behind and beside the unit for adequate airflow. Tucking machines into tight cabinet corners might save visible counter space, but forces the cooling system to work against its own heat buildup. The resulting efficiency loss increases power consumption and accelerates wear on components.
Electrical Proximity
Position your ice maker near existing outlets to avoid stringing extension cords across walkways where they create trip hazards. If using a power station, place the battery unit nearby but not directly underneath in case of water spills during refilling.
Water Access
Set up your machine within easy reach of your primary water storage or tap connection. Carrying water containers back and forth across a tiny home grows tedious quickly. Some users keep a dedicated water pitcher beside their ice maker to streamline the refilling process.
Sun Protection
Direct sunlight exposure sabotages ice production efficiency. Direct sunlight and radiant heat warm the machine’s exterior, forcing the compressor to work harder and reducing ice output. Even brief sun exposure during midday can significantly reduce ice output. Position your unit away from windows or install a shade if no other location works.
Travel Securing
Machines bouncing around during travel suffer internal damage to compressors and water lines. Solutions for van installations include:
- Non-slip mats for basic stability during gentle driving
- Custom brackets bolted to counter surfaces
- Bungee net systems for quick removal and reinstallation
- Dedicated storage compartments with foam padding
Always remove the water reservoir and ice basket during transit to prevent spills.
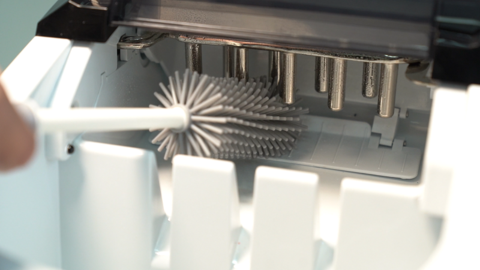
How to Keep Your Ice Maker Fresh on the Road
Weekly cleaning helps reduce scale buildup and lowers the risk of odors and microbial growth that can affect ice quality and performance. Mineral deposits from hard water accumulate on freezing plates, reducing contact efficiency and extending production times. Regular maintenance takes 30 minutes but extends equipment life by years.
Basic Cleaning Procedure
Follow these steps for weekly maintenance:
- Unplug the unit and remove all the ice from the basket
- Empty the water reservoir completely, including residual water in the bottom corners
- Mix cleaning solution using commercial ice maker cleaner, white vinegar, or lemon juice diluted in water
- Fill the reservoir with cleaning solution and run a complete ice-making cycle
- Discard the resulting cubes and repeat the cycle twice
- Drain the reservoir and rinse thoroughly with fresh water
- Run two more cycles with plain water to eliminate the remaining cleaner
- Wipe down external surfaces and the ice basket with a soft cloth
Water Quality Management
Filtered or bottled water reduces mineral deposits compared to straight tap water, especially in regions with high calcium content. Many van dwellers filter their water through portable systems then use it for both drinking and ice production. Distilled water eliminates minerals entirely but tastes flat to some palates.
Storage Between Uses
Complete drainage and drying prevent mold growth during periods of non-use:
- Leave the lid open for several hours after final cleaning
- Allow air circulation through the interior
- Place silica gel packets inside to absorb residual moisture
- Store in a dry location away from temperature extremes
Descaling for Stubborn Deposits
When you notice white crusty deposits on visible surfaces or ice production slows despite regular cleaning, run a descaling cycle using citric acid solution. Follow the same procedure as weekly cleaning, but let the solution sit in the reservoir for 15 minutes before running cycles. This intensive treatment should happen monthly in hard water areas or quarterly with filtered water.
Conclusion: Cool Down Your Adventures
Space-efficient ice makers transform tiny living from a compromise into a complete lifestyle. Fresh ice enhances your daily comfort while the compact footprint and modest power requirements fit seamlessly into off-grid systems. Matching the right features to your specific needs ensures years of reliable service, whether you're parked at a trailhead or hosting friends at your tiny house.
FAQs
Q1: How much power does a portable ice maker use?
Most models draw about 100–170W while actively making ice, then drop to a low standby draw when the basket is full. Your daily energy use depends on how many batches you make and ambient temperature, but for many people, it lands in the few-hundred Wh to around ~1 kWh per day rather than “all-day continuous” consumption.
Q2: Can I run an ice maker on a 100-watt solar panel?
A single 100W panel is usually not enough on its own to power an ice maker reliably. With a battery, it can offset a small daily ice run in strong sun (often closer to ~1–2 hours of total compressor-on time, depending on your machine and conditions). For more dependable daily ice, plan on ~200W+ of solar and roughly ~1,000Wh of battery storage.
Q3: What distinguishes bullet ice from nugget ice?
Bullet ice forms as hollow cylinders that melt quickly and work well for fast beverage chilling. Nugget ice consists of compressed ice flakes, creating a softer, chewable texture that absorbs drink flavors and blends smoothly in frozen beverages.
Q4: What size ice maker fits in a tiny home kitchen?
Units measuring 9 to 12 inches wide fit most compact kitchens when accounting for required ventilation clearance. Models producing 26 to 35 pounds daily satisfy most households while maintaining manageable dimensions and a weight under 18 pounds for easy relocation.

Leave a comment
All comments are moderated before being published.
This site is protected by hCaptcha and the hCaptcha Privacy Policy and Terms of Service apply.